Stop Making These Photography Mistakes
All photographers make their fair share of mistakes. Today, I want to talk about some of the most common photography mistakes and how to fix them. Regardless of how long you have been a photographer, I guarantee this article is going to help you!
5 Ways To Fix Your Photography Mistakes
1.) Start Shooting Your Photos In RAW
Where do I even begin with this?! Shooting in RAW is something that ALL photographers should do, especially professional photographers. When editing, a RAW file is so much more useful than a JPG file. Essentially what a RAW file does is take all of the data from your camera's image sensor and saves it in an uncompressed format. RAW files do in turn take up more space on your memory card, but the control they give you when editing is unmatched. It's very easy to recover photos that are overexposed or underexposed due to the fact that more details from the original photo are stored into the file. 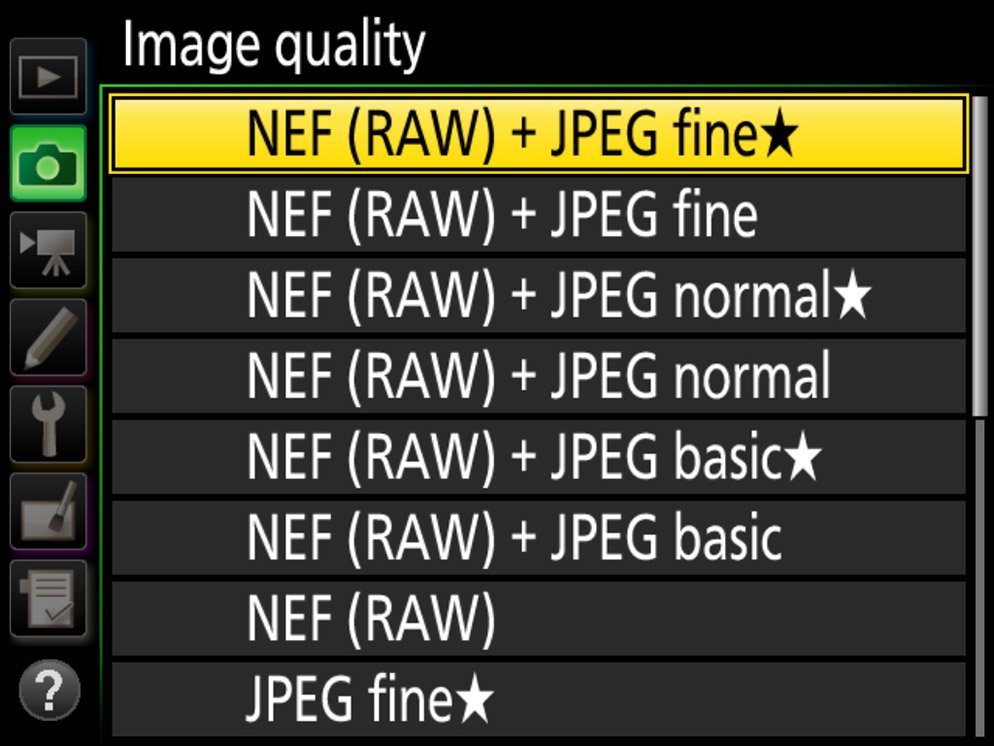
2.) Start Backing Up Your Work
Backing up your work is honestly probably the most important thing on this list. There are countless horror stories that you can find online where photographers unfortunately lose all of their work and have nothing left to show for. This can happen a variety of ways but the most important thing that you do is make sure you have steps in place to prevent it from happening. I back my work up on a variety of places. I keep all of my edited photos on my computers, phone, and external hard drives. I also make sure to back up all of my RAW files and unedited JPG files onto SD cards and external hard drives. If you travel a lot I recommend purchasing some portable hard drives (click here to see the ones I use). However, there are also some other great storage devices that can be stationary for you to be able to transfer all of your work onto, to ensure that you don't have to worry about losing anything. I recommend you do your own research and fine what works best for you and your workflow! 
This is the portable hard drive that I use to back up all of my work and it has always worked great for me!
3.) Stop Over-editing Your Photos
Photographers at all levels of experience are guilty of over-editing photos, but it's especially common for beginners! It is important to make sure when editing that you don't go "too far". What I mean by this is be mindful that you TYPICALLY want the image to look as close as it did to the scene you photographed in real life. Now there are exceptions to this if you are doing a creative edit for something like portrait photography, but most of the time you want a photo to look realistic. Don't take the saturation, clarity, and sharpness all the way up on their sliders or you are going to get an image that doesn't look realistic at all!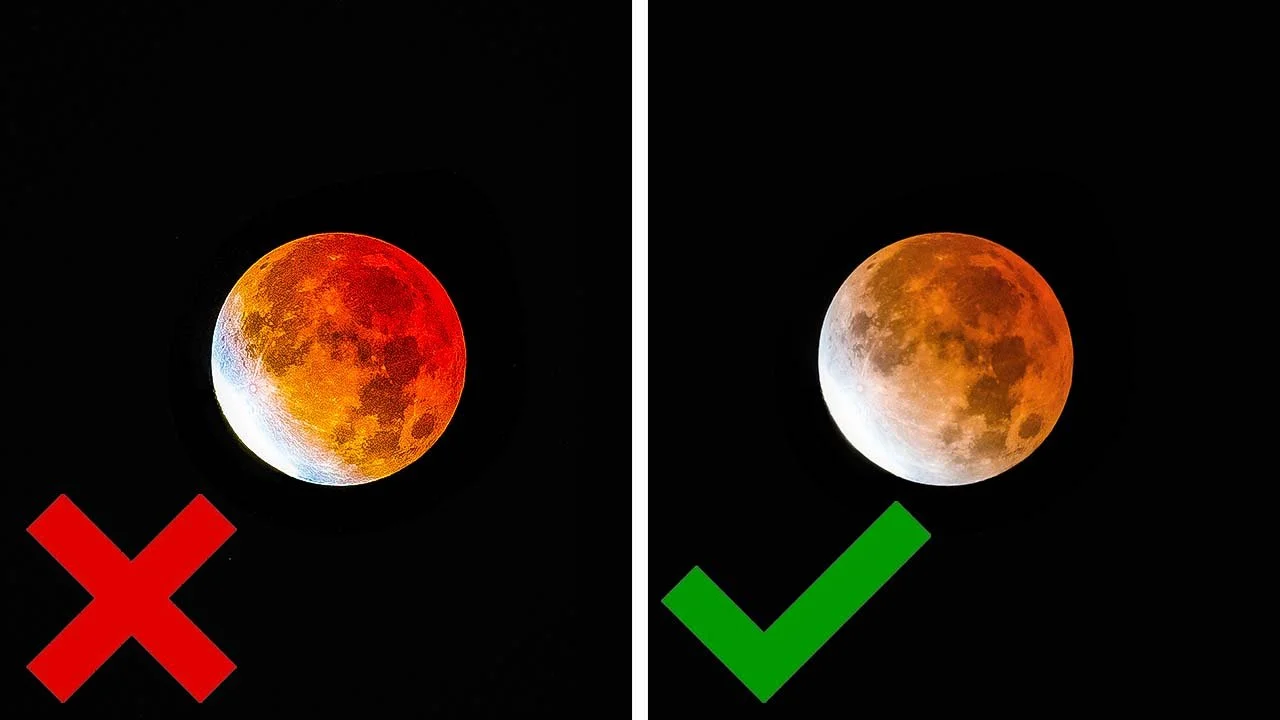
As you can see here, the photo on the left is a bad edit with the sharpness being too strong as well as the clarity and saturation. The photo on the right is a good edit that depicts what the scene truly looked like!
4.) Stop Shooting Every Photo At Eye Level
Anyone can take a photo at eye level. When you take all of your photos standing up it is going to prevent your work from going to the next level. There are so many different ways to make a scene or a subject stand out by not always shooting a photo at eye level. This is one of the key points that I talked about in my Wildlife and Bird Photography Full Tutorial video. When photographing animals a good trick is to get onto their eye level or to get below their eye level. Most of the time this means squatting down to the ground or even laying on your stomach. Most people aren't going to go the extra mile to do this when taking a photo and it is going to make your work stand out even more! You can apply this same principle to portrait photography. In portrait photography, rather than getting below your subject I like to get above them slightly. This provides a pleasing to the eye angle of the person and it makes your portraiture stand out! In the photo down below, I laid down flat on my stomach to provide a photo that is on the eye level of the subject. Most people don't typically see Eastern Cottontails at this angle which makes this photo stand out from a lot of others.
5.) Start Using the Rule of Thirds
I cannot tell you the amount of times that I have seen aspiring photographers take a photo with the subject directly in the middle of the shot. While at times, this may be the right approach to taking a photo, a lot of the times it is not. Most times, it is good to position your shot with the subject on one of 4 imaginary lines that are running through your photo. This is a compositional technique that allows your eyes to more slowly and smoothly to take in the entire scene of a photograph.
As you can see, in this particular image, I followed the compositional technique known as “the Rule of Thirds”. The lines that I have overlaid with this photo shows you what I mean by the Rule of Thirds. There are 4 lines and an image looks the best if the subject is placed on one of those lines rather than in the middle of the shot. A lot of the times it will look even better if you place a subject on a point in the shot where those lines intersect like I did in this photo. When photographing moving subjects it is also important to keep in mind the Rule of Space, which I talk about in this video.
I hope that this article will allow you to improve your photography skills and take them to the next level. Don't feel bad about yourself if you make a lot of these mistakes or even just one of them. The fun thing about photography is that you learn and improve as you go! So start trying out some of these tips and watch your photography improve right in front of your eyes!To see more of my photos and connect with me follow me over on Instagram! @rylansamazingphotography